

This Sewn Deck Box is perfect for holding cards of any size and is easily adjustable to suit any organizational needs!

As someone who is used to having a deck box for cards, I found myself searching for one when I had a collection of smaller cards. Well… calling it a search would be a bit of a stretch since I didn’t do a search. I already knew of some products that were the right card size but couldn’t hold the amount of cards that I grabbed. And I just assumed from there.
After deciding what I wanted didn’t exist and I would have to make it, my mind became a whirl of activity. Coming up with patterns has never been my strong suit, but I do love a challenge. Especially when that challenge is box-shaped. It was a bit of a journey; I made a couple of mistakes, but I do love how well the cards fit inside. And how cute it looks!

Check out the Craft section of MCG for more fun patterns in strings and things or more unlimited ideas.
Supplies

For this deck box, I gathered the following materials:
- A snap and the associated snap tools
- A plain fabric
- A patterned fabric
- A fabric stabilizer
Process
The Pattern

The first step to making the deck box is coming up with a pattern. I find patterns are particularly important when it comes to sewing. Great shock, I know. But some crafts you can approach without a plan. Others… not so much. I have made many lopsided projects due to a lack of patterning.
Anyway, I knew that I wanted to end up with a box shape, and I feel that creating a cross lends itself well to making a square. The major thing I wanted to take into consideration was the size of the card. The card size dictates the height and width of the deck box. The depth of the deck box was a bit more arbitrary. I measured the stack of cards, but it is the most variable measurement based on need.
I did choose to extend one of the ends so it would make the lid come down over the side. This let me have a snap clasp in the front, which I feel elevated the project. I love sewing, but when a project is missing finishing touches (like connectors), the project can sometimes fall flat.
Cutting the Fabric

The next step in making the deck box was cutting the fabric. This is where I did something I regret, I cut the plain and patterned fabric according to the design. They were both singular pieces.
This is what I should have also done for the fabric stabilizer. But no, I saw that I had some scraps and thought I could use them in this project. While it did cover the desired spaces, the gaps did cause some issues. My desire to use scraps outvoted doing the project in a more practical way.


One thing that I quickly discovered was that smaller pieces of fabric stabilizer don’t adhere to fabric as well as a large piece might. There is just not enough of a surface to really cause the material to stick in a meaningful way. It looked fine coming off the iron but quickly started to fall apart. But I plowed forward, being the stubborn one that I am.
Sewing the Core of the Deck Box
I did learn a bit from some of my earlier projects and decided to use the stabilizing fabric on the plain pattern. This meant that the project wouldn’t need to be turned inside out and therefore put strain on the stabilizer. Or that would be the concept if I hadn’t cut it into smaller pieces.


I started to sew the inside by joining the fabrics to their adjacent sides. The box came together fairly, as the prep work gave me a good edge to work against. I sewed the side of the main box and then put it aside and switched to the outer box. This one has some longer edges because I wanted to do a fold-over effect (more on that later), but the core box is sewn together in a similar way.
One thing I did when cutting the fabric was create a hole in the front of the deck box. I did this to help grip cards and remove them from the box. The issue with this is that the fabric acts a little differently when in one direction versus another, especially with tension on its opposite side. This is one thing I wish I had cut with either more slack or after combining the two.

Combining the Edges

The inside (plain fabric) box fits very snugly in the outside (patterned fabric) box. The patterned fabric had a bit more fabric around the edges because I wanted to do a fold-over seam. This is where I planned on folding the fabric twice. One to hide the edge of the fabric, the other to go over both fabrics and join them together.
This process was made a lot more difficult than needed, especially at the deck box opening. One thing I wish I had done was make fewer cuts. The fabric being uncut along most of the edges would have given a cleaner finish. But it still worked, even with some effort and the need to hand-sew one of the seams.


The last step for making the deck box was adding the snap. This is a pretty straightforward process as long as the holes from each side line up properly. I tried to put the box in its final position and create a hole going through the lid and the main body. This helps with position as you work with different sides.
Reflections
There was a lot that I liked about this sewn deck box and a bit that I didn’t. But that’s hardly a surprise since it was my first attempt at this project. I think there was good intention with the edging, but it could have been executed much better. And the same goes for the front opening on the deck box.
The cards did end up having a very snug fit, which was perfect for what I wanted. It got me thinking about what I would have to take into consideration if I ever wanted to make a deck box for a sleeved standard-size card. I am also curious to try again with the opening on the long side instead of the short side. This is a project I want to revisit!

Lessons
Thinking of Edges
When working on this deck box, I planned on folding over to finish the edges. One thing I wish I had thought about was using ribbon or a detached fabric strip. I think that there would have been benefits (and drawbacks) from using additional fabric.
The biggest benefit would be a more cohesive look and better coverage. This would be especially beneficial for the front cutout out where I was already low on fabric. But adding more fabric is ultimately adding. This would potentially make some of the edges bulkier, but I think that would be minimal in comparison to the crispness it could bring.
Pattern
Sewn Deck Box
Ingredients
For Card Size: 3.5 inches by 2 inches (Business Card) with ¾ inch deck Size
- 1 11 by 9 ½ Plain Fabric
- 1 11 ½ by 10 ½ Patterned Fabric
- 1 9 by 7 ¾ Fabric Stabilizer
For Card Size: 2.5 inches by 3.5 inches (Poker Size Card) with 2-inch deck size.
- 1 15 ½ by 11 Plain Fabric
- 1 14 by 10 Patterned Fabric
- 1 9 ½ by 9 Fabric Stabilizer
Standard Materials
- 1 Snap color matching to patterned fabric
- Thread color matching to patterned fabric
Instructions
- Cut out the fabric according to the pattern. Each fabric is denoted by a different color in the design drawing.
- Use an iron (or other specified method) attach the stabilizer/interfacing to the solid fabric so that the center of the two crosses align.
- On the solid fabric, sew the adjacent edges together so that the interfacing is facing the outside. The two front corners will align perfectly. The back side of the fabric will continue passed the two back corners (this will become the lid). Set aside.
- On the patterned fabric, sew the adjacent edges together with the wrong side of the fabric out. This will look just like a solid fabric box. Turn inside out.
- Gently push the solid fabric box into the patterned fabric box. It will be a snug fit. The patterned box edges should come out passed the solid box on all open sides. Fold the excess fabric over the opening and onto the solid fabric. Sew together along each edge.
- Align the lid with the front of the box and drive a pin through both to create a hole. Attach the snap as per its directions.
Notes
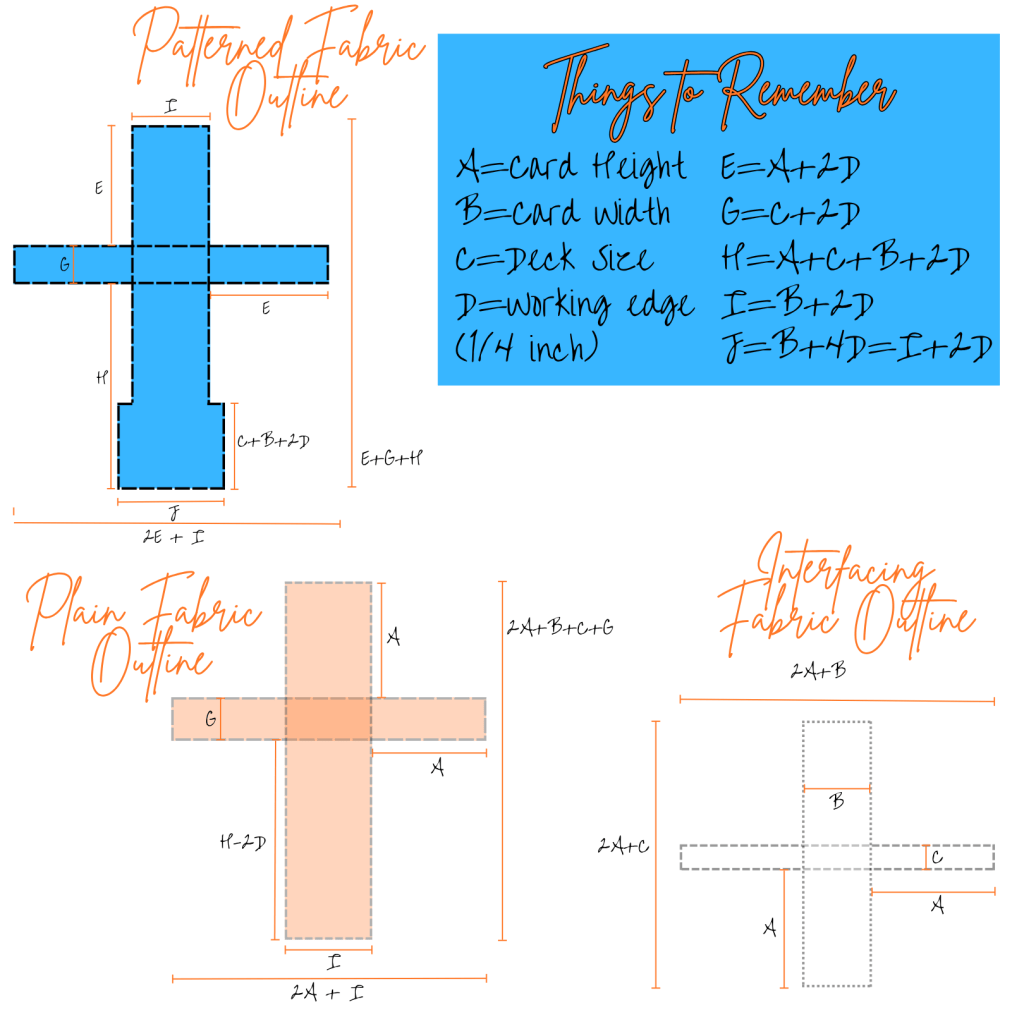
| Variable | Description | Equation Needed | Broken Down to Basic Variables (A,B,C,D) |
| A | Card Height | – | – |
| B | Card Width | – | – |
| C | Deck Size | – | – |
| D | Working Edge | – | – |
| E | Card Height plus working edges | A+2D | – |
| G | Deck Size plus working edges | C+2D | – |
| H | Card Height plus lid | A+B+C+2D | – |
| I | Card Width plus working edge | B+2D | – |
| J | Card width plus double for the working visible edge. | I+2D | B+4D |
| Patterned Fabric – Top to Bottom | A+G+H | 2A+B+2C+4D | |
| Patterned Fabric – Side to Side | 2E+I | 2A+B+6D | |
| Solid Fabric – Top to Bottom | 2A+B+C+G | 2A+B+2C+2D | |
| Solid Fabric – Side to Side | 2A+I | 2A+B+2D | |
| Interfacing – Top to Bottom | 2A+B | – | |
| Interfacing – Side to Side | 2A+C | – |


Leave a ReplyCancel reply