

These scrap shorts are a fun way to recycle old clothing while making breathable and stretchy shorts with a striking look.

I recently cleaned out my closet and it dawned on me how much fabric I have. It is quite a bit. More than I had originally thought, at least. Among the cloth, I found a large amount of scrap fabric from old T-shirts. I liked the feel and stretch of this fabric, and it got me thinking. How about I turn these clothing scraps into different clothing?
That’s when the idea of shorts came into my mind. I have plenty of jean shorts but nothing I can just relax or sleep in. And that is a major problem right not because the weather is starting to head to over 90° Fahrenheit O.O. That is too hot to wear pajama pants.

So now that I had an idea, I had to figure out how to execute it. I have never made clothing before, so thing was a fun challenge to figure out and plan. Did I make mistakes? Absolutely. So, I like how it turned out? YES! Coming out with the design and sewing everything was a fun experience. I got so absorbed in what I was doing, and I might have gone too fast, but I still love how they turned out. And it was a great learning experience.
Check out the Craft section of MCG for more fun patterns in strings and things or more unlimited ideas.
Supplies

For this project, I only needed a few materials. I needed:
- Fabric, I used 7 different colors of solid fabric
- Sewing Thread, Black cause it’s easy
- Elastic, for the waistband
There were four large panels of fabric (12 by 12 inch) needed for the project and then many 2 ½ inch fabric strips. The strips were varying in length, but longer strips give more leeway when working with the project. For the elastic band around the waist, I used a strip that was 6 inches by the waist measurement.
Process
Prepping the Fabric
The first step of the pattern is prepping all the fabric. I didn’t necessarily do this all before I started sewing and I do think that was maybe a mistake. Working with the 12 by 12-inch panels of fabric first would have been smart because these panels became my template for the patchwork panels.
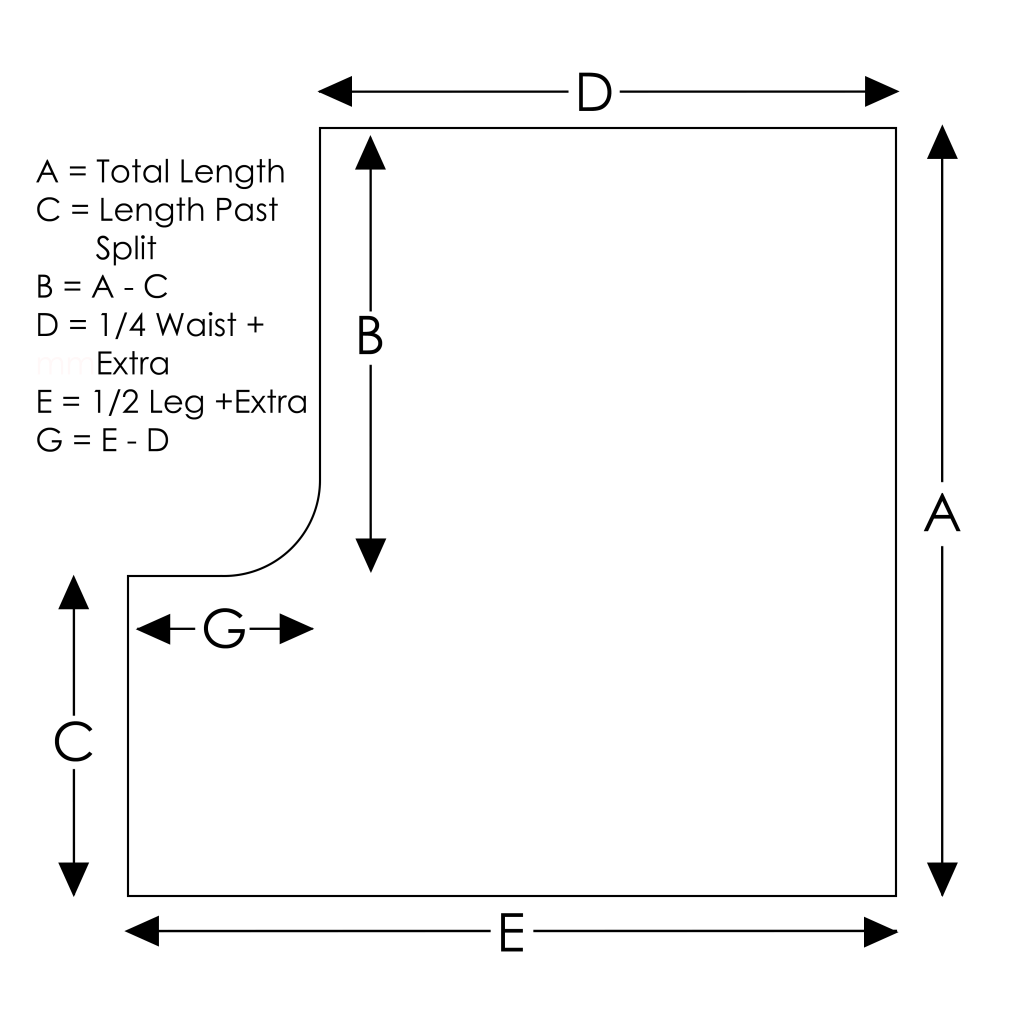
The large pieces of fabric were going to be the lining on the shorts. I wanted to cover all the steams from the patchwork. To prep the fabric for the patchwork, I did calculations based off my body and my preferred measurements to create the panel. A is the total length of the scrap shorts from waist to where they end on the leg. B is the length from the waist to where they splint into the two pant legs. C is the difference between A and B.
D is ¼ of the waist and E is ½ of the leg plus an inch or so. This is where I messed up a bit. D should be a little bigger to give more room to move. It should probably be more around 1/3rd of the waist rather than 1/4th. G is the difference between D and E. The curve between C and G should be leaning toward a 90° angle but it does not have to be perfect.
Now, I did these very close to my actual body measurements which was a mistake. I should have made the whole thing a little bigger because the scrap shorts turned out a little tight. Still fit though. Just forgot to add one or two inches as the extra.
Patchwork Panels
The process for sewing the four panels that make up the front and the four panels that make up the back were very similar. First, I placed the good sides of the matching panels together and stitched along the line to curve (G leading into B). This is the seam that goes along the center of the pants.


I repeated this step for the inside and outside fabric making the four panels turn into two. And then it was time to turn the two panels into one. I placed the “right sides” against each other. The center seams for both panels should align. This will make the front half of the scrap shorts.
I sewed together the two panels along the A, B, and E lines. This left only the top unconnected. Then I turned the piece right side out. I wanted to make sure all of the corners were pushed out. Since these two pieces are going to stay together in the final product, I did an outside stitch along the E line to create a flattening seam. Then I repeated this process on the other two pieces of fabric.
Sewing the Front (and Back)
The process for sewing the four panels that make up the front and the four panels that make up the back were very similar. First, I placed the good sides of the matching panels together and stitched along the line to curve (G leading into B). This is the seam that goes along the center of the pants.
I repeated this step for the inside and outside fabric making the four panels turn into two. And then it was time to turn the two panels into one. I placed the “right sides” against each other. The center seams for both panels should align. This will make the front half of the scrap shorts.
I sewed together the two panels along the A, B, and E lines. This left only the top unconnected. Then I turned the piece right side out. I wanted to make sure all of the corners were pushed out. Since these two pieces are going to stay together in the final product, I did an outside stitch along the E line to create a flattening seam. Then I repeated this process on the other two pieces of fabric.
Joining the Front and Back
Next, it was time to join front and back pieces so really get these scrap shorts to take shape. I put the patterned sides against each other so that the lining was facing out. Then I stitched together the sides along line A and C. This is a total of 4-line stitches since there are two A and two C sides. Although I was able to do both C sides in one stitch because it effectively became a straight line.
This left the top as the only unfinished side. Which is perfect because I wanted to add an elastic band around the entirety of the waist. To do this, I needed a long strip of fabric that was 6 inches in width and could go completely around “waist” area of the shorts.
I folded the strip in half with the good side facing out. Then I attached the edge with the two edges (not the fold) to the rim of the shorts. This should be done against the inside fabric, but it technically can work (and look good) either way.
I made sure to connect the ends of the strip at this point as well as the seam can be hidden better if it’s connected here. With the strip attached to one side, I folded the strip over to the other side of the shorts. The strip should go beyond the edging of the shorts to hide the edging.
I love how the fabric being folded makes a clean edge for the strip. I sewed along this edge to cover all edges and to create a channel. But I did not sew the channel shut just yet though. I left a small opening to thread the elastic through the waistline. Then I sewed the elastic together and then sewed the channel shut. And voila! I made clothing!
Reflections
I think I did well all things considered. I really love how these turned out, even if they are a little tight, they fit well. And the design makes them feel fun and unique. The fact that these scrap shorts are made from shirts makes them soft. Having shift fabric really helps since they are stretch and feel good against skin.

My biggest mistake was when I was putting together the strips of fabric for the outside panels. I was trying not to use too much excess fabric and in my sparing ways, I ended up using too little on some of the edges. Not having enough fabric to work with is not the best choice. Funnily enough, the holes aren’t that noticeable since they show the inside layer instead. But still not quite right.
Lessons
Where are the Pockets?
I originally planned to put pocked on these shorts. I had the pockets sewn in for a long period of time. But I didn’t really thing about placement. The slant I wanted made perfect sense, but the placement was close to the thigh than the hip. I had effectively centered the pocket on the panel rather than leaning toward the A / D corner.
This project was extremely hard for me to visualize which is a big reason for this mistake. Keeping it simple during a first attempt is a great way to learn without getting mentally overtaxed. Bells and whistles can always be added when the project is made again.
Quick Recipe
Scrap Shorts
Ingredients
Fabric
- 18 2-inch Strips of Fabric this is based on a A=12 inches and E=12 inches
- 4 A x E-inch solid piece of fabric can be the same color or different
- 1 6x4D-inch solid piece of fabric
Other
- Sewing Thread Black
- 1 3D-inch Elastic Band
Instructions
- Where to stitch on each panel will be indicated by the below image. The panels will use the following abbreviation scheme in combinations for the 8 panels: LFI (Left, Front, Inside), RBO (Right, Back, Outside)

- Cut out 4 A(desired length from waist) by E (½ leg circumference plus extra as desired) panel. These panels will make up the LFI, RFI, LBI, RBI.
- Cut 2-inch strips of fabric. Layout fabric as desired to make 4 panels that are size A by E. Sew the strips together with the right sides facing inside. Continue this process until 4 panels have been made (LFO, RFO, LBO, RBO).
- Cut each panel according to the pattern. Remember to add some extra room for the section marked D. This will help for a less tight fit and will be offset by the elastic waistband.
- With the right sides facing each other, sew LFO and RFO together along the B and G lines. Repeat with the other three pairs (LFI and RFI, LBI and RBI, LBO and RBO). From here, the panels will be referred to using the last to abbreviations (i.e., FI – Front, Inside)
- With the right sides facing each other, sew FI and FO along both A, E, and C lines (12 lines total). There should only be one opening along the D lines. Flip right side out and push out corners. Sew along each E line flatten the seam. Repeat for the BI and BO panels.
- Place the right side of the front panel against the right side of the back panel. Sew along both A and C lines (8 lines total). Flip right side out.
- Take a strip of fabric that is 6-inches wide and long enough to cover all the combined D lines. Fold in half. Place the edge made up of two edges along the D line of all four inside panels. Sew to connect the strip to the short and connect the strip to itself.
- Fold the strip so that the folded edge is now against the outside panels. This should go past the D line edge, so it is no longer visible. Sew along the unsewn edge leaving a 1–2-inch gap to allow access to the channel.
- Pull the elastic through the channel made by the strip. Sew elastic together to create a continuous band. Sew the channel shut by finishing the line made in the previous step.


Leave a ReplyCancel reply