

This beaded dreamcatcher is the perfect addition of colorful decor for any household.
Get your own at the MCG and Etsy store!

I have a lot of beads. Too many if I’m honest. So, I started to explore the internet for ideas and came across bead weaving. I also found a metal ring when going through my closet. My mind went to creating a beaded dreamcatcher (or dreamcatcher adjacent). I thought having a circular pattern of beads would look pretty and the metal ring would add a finished polish to the edge.
While I saw bead weaving final products, I didn’t really investigate how to do this craft. There were several misfires for starting this project. I tried making a weaving grid which didn’t work well on a circular surface. Then I tried to start from the outside and work my way in. That was also a bad decision. I’m sure both are possible, but I struggled with getting started without it looking wonky.

Finally, I started from the inside and worked my way out. I did singular-colored rings, but I feel like there are a lot of pattern options that I could do (that’s a project for later). Starting simple seemed like the best idea. Well… simple in terms of the design. Not so much the craft.
Check out the Craft section of MCG for more fun patterns in strings and things, or more unlimited ideas.
Supplies

For this project, I didn’t need many supplies but that’s also because a lot of them came in a kit. I ended up using 13 colors because I wanted the whole rainbow and then some. Having some of the transitions between colors being on a larger gradient also gave it a more cohesive look to me. I also used a more reinforced nylon thread, a metal ring, and a beading needle (which is extremely skinny. I thought it was going to break, and it did, but it was still usable). I also picked out a yarn that matched the color of the final beaded layer. This was gathered more toward the end of the project since I didn’t know which color I would end on.
Process
Beading the Center

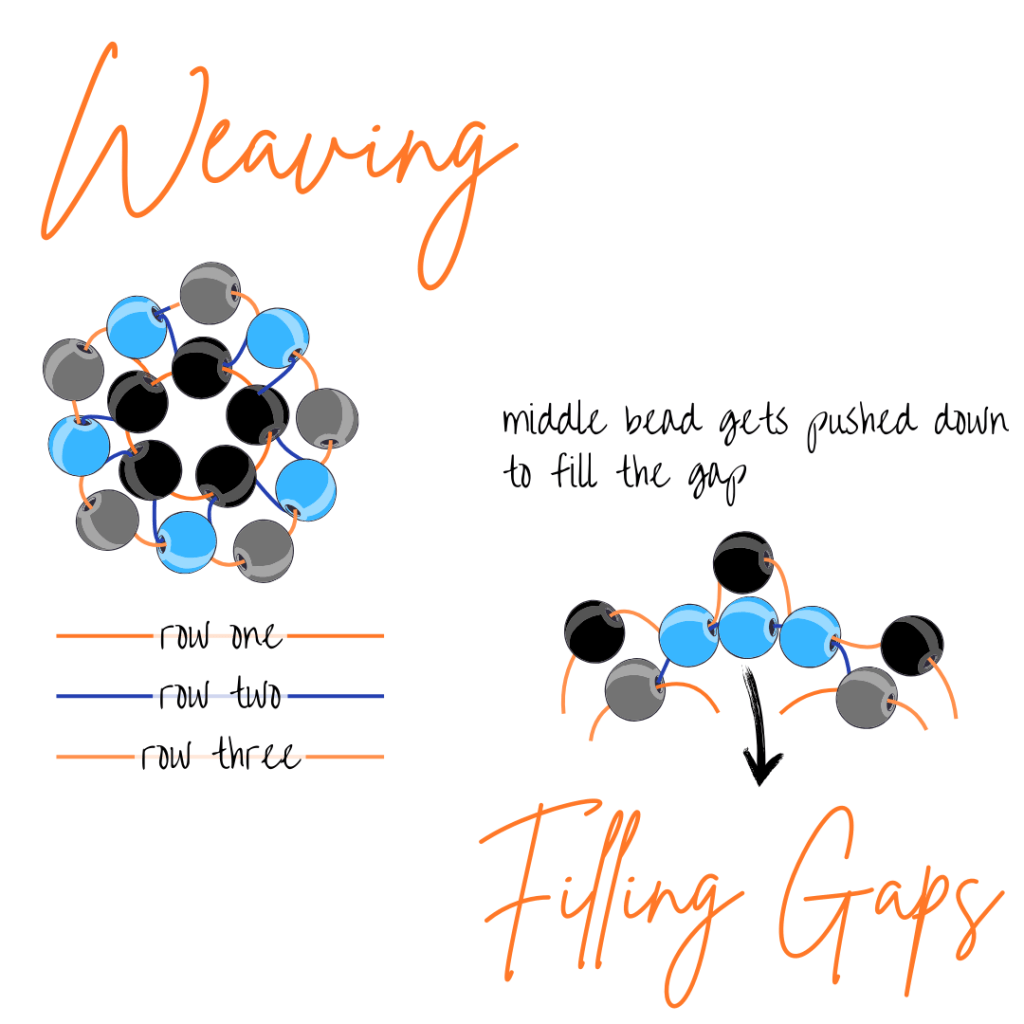
The first step of the process is creating the beadwork that is going to go in the ring. I started by putting 5 beads on a string and tying the end together. This created a very small and chaotic circle. I was a bit nervous about how lopsided the circle looked but it turned out to be a non-issue.
Then it was time to weave. The basic gist of the weave was adding a bead between two beads on the previous layer. This makes the layers become staggered and nestle into each other. I wanted to two times with a single color to create a contiguous circle. The first layer would cover ever other bead of the layer before so when I covered every bead of the previous color, I knew it was time to move onto the next.
Adding Beads

Then I ran into the issue. The gaps were getting larger and larger. More beads needed to be added to the layers as they increased in size. Make sense. But how? I played with a couple of different methods.
Adding one extra bead makes the row a little awkward, but I found that adding three beads at a time for an increase worked best for me. This makes the next row keep the same pattern as the jump is created. I did this with the same color, but I think having the center bead be the color of the previous row would have also worked out well.


Figuring out when to increase the number of beads in the row did prove to be a bit of a challenge. I didn’t want to add to many too quickly and cause the piece to scrunch up. But not enough would create visible gaps. It was a difficult balance.
Attaching to the Ring
Once the beaded section was big enough to fill the ring, I started to attach the two pieces together. After coming out of each bead I would loop around the ring and then bead through the next. At first, the project was very slippery, but it became more stable as time went on. The more attached it was, the less opportunity to move.


By being methodic, I was also able to identify the larger gaps between the beaded section and the ring. Keeping it as full as possible was my intention and I was sticking to it. Being able to weave more beads in to fill the space was needed in a couple of areas.
At this point, I also switched the thread to match the final beaded layer. This was to add some cohesion between the ring and the beads. I also felt that wrapping the ring would make this beaded dreamcatcher a bit more like… well… a dreamcatcher! I alternated between using the sewing thread and embroidery thread. The embroidery thread provided more coverage and just gave a better finish.

Decorations

When I think of dreamcatchers, I know they have some form of trinkets hanging off them. I really wanted to do this but in a beaded form. I was of two minds; one idea was more thread based while the other was beading to mimic a feather. While the feather idea felt very fun in concept, it got a little more overwhelming in practice, so I went with a simpler approach.
I decided to do a string of a handful of the colors to create a hanging pattern. The beaded strings had a start and end somewhere on the ring with the different colors overlapping. I thought having the strings be different lengths would also provide an interesting aesthetic.

Reflections
This type of craft is definitely new territory for me, and I am really enjoying learning the process. There were some hiccups when making the beaded dreamcatcher but that’s to be expected with a new craft. And I still think the result was beautiful and quite striking. I love the way the metal ring gives such a clean outer shape. It would be possible to accomplish this with just the beads but because the beads that I was working with weren’t consistent in shape, the ring was the best solution for me. It also added some stability which I do think was needed.
And I do think this is something I will be offering in the MCG and Etsy store.

Lessons
Failing to Succeed Does Not Mean Failing to Progress.
I had quite a few false starts when trying to make this beaded dreamcatcher. I tried to do a loom approach, but the string wanted to slide along the ring (unsurprisingly). When I started from outside, at the ring, the project was too stiff to allow for the beads to have enough room to be manipulated.
While these starts didn’t lead to a finished product, they did teach me how difficult some methods could be. And the challenges that come with them. There is a change I try these starts again but now I know the difficulties I will be facing and can come up with a plan to circumvent them.
Pattern


Beaded Dreamcatcher
Ingredients
- Nylon Thread
- Embroidery Thread
- Small Beads
- 2-3 inch Metal Ring
Instructions
- Thread five beads onto a piece of nylon thread. Tie the nylon thread so that the 5 beads become a circle.
- Alternate between adding a bead to the thread and threading through the next bead. When the gap gets too large, add three beads to the thread instead of one. Continue weaving as normal.
- When the weave is large enough to fill the metal ring, weave the thread through a bead and then use the thread to create a knot around the metal ring. Continue with every bead until stabilized.
- Add hanger and beaded accessories as desired. Using premade charms is also a good way to personalize the beaded dreamcatcher.
- Wrap the ring in the desired embroidery thread.


Leave a ReplyCancel reply