

This mosaic painted jar is a fun and easy craft that creates a great candle holder or organizer for any home.

The amount of peanut butter jars I have in my closet is starting to get out of hand. I get a new one every one to two weeks and they just keep stacking. There has been a voice of sense saying I should just recycle them and be done with it. But they are such good jars, throwing them away feels like such a waste. But I do need to start doing something with them.
Then I got an idea while looking through my supplies. Why not paint the glass? I like the idea of doing geometric shapes and it can create a great exterior for candles or organizational holders. This is a simple project but there were a surprising number of hiccups and other surprises that I didn’t really take into consideration when I started.

Check out the Craft section of MCG for more fun patterns in strings and things or more unlimited ideas.
Supplies

For the mosaic painted jar project, I used tape, paint pens, and a sealer paint to make sure the paint doesn’t scratch. I guess I also used black spray paint. I have sprayed all my bottle lids black to cover their original design, but I sometimes forget that is not their natural state. One of the big problems I realized after the first attempt was the type of tape matters.
I originally used my double-sided tape because I thought it would have a good seal and enough of a width to accomplish the look I was going for. But removing the tape was a greater struggle than I anticipated. Some strips came off clean while others, not so much.
This is when I realized I should switch to painters’ tape. I was pleased to find that there was smaller width painters’ tape than the standard 1-inch. But more on that later.
Process
Making the Design
The first step for making these mosaic painted jars is laying down the tape to make the design. There are a lot of decisions to be made for step. My first jar stayed in the realm of rectangles. I didn’t want to start off too wild, but I quickly discovered that making the rectangles appear on different levels needs some active care. Doing a more haphazard design seemed like a more relaxed and fund approach.
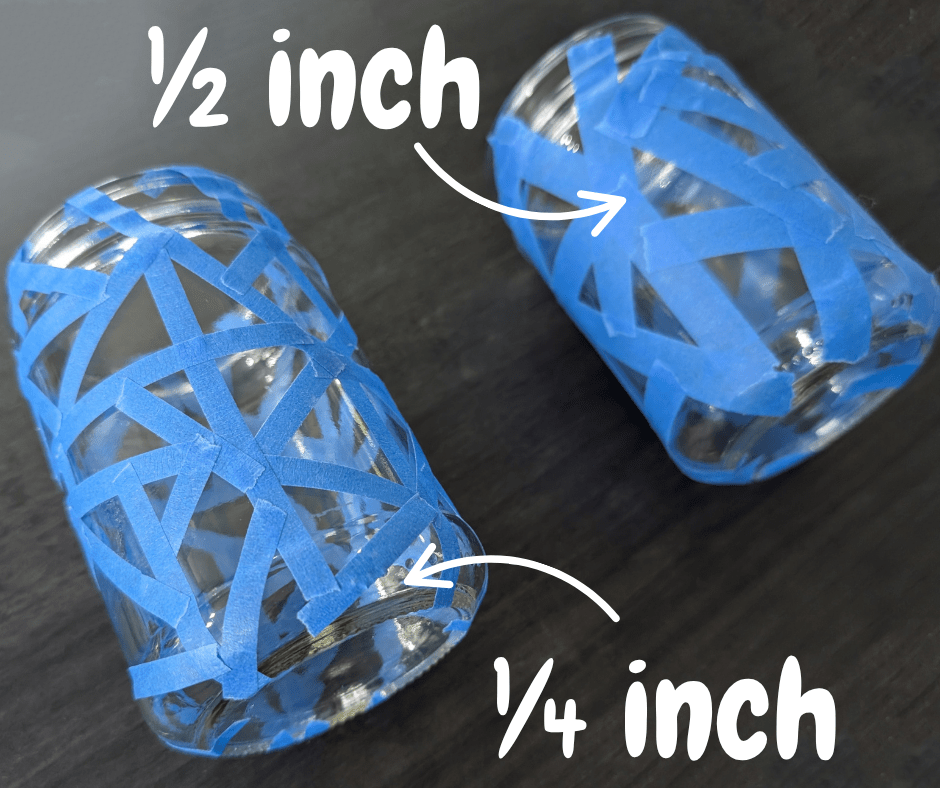
There was also the negative space to take into consideration. Once I got painted tape, I wanted to do an experiment with both ½ inch tape and ¼ inch tape. I quickly came to discover that ½ inch was a little too big for what I wanted so I would recommend using the ¼ inch painters’ tape if it’s available.
I tried to layout the design in a free form pattern that created a mosaic like effect. It became a go with the flow moment, but I made sure to only use a few long strips. This helped keep the nature of the design more chaotic and less structured.
Coloring!
The next step is to color in the open, non-covered spaces. Picking out colors is always a difficult decision. But because it’s June and my default setting, I started out with the colors of the rainbow! I also have ideas for color gradients but that will be for another time.


One thing I tried hard to accomplish was to make sure that none of the same colors shared a border. I wanted to have all the colors really mixed. Especially with a rainbow as the foundation. Although, this exercise did make me curious what a single color would look like, and I did end up giving into that curiosity.
Undoing the Tape
To finish this mosaic painted jar, I started by removing the tape. This made the contrast between the color and negative space very stark. And honestly, I didn’t like it. I felt like there was just something lacking. Especially on the jar that used ½ inch tape. This did feel like a failed project at this point, and I put down the glass and went to work on something else to get away from the disappointment.


When I came back, I noticed the black and white paint pen and an idea popped into my head. I decided to use the pen to outline each square, and the color really popped! Doing this also removed some of the overwhelming negative space which really added to the piece. The only difficult thing was having to draw out every line by hand. I am proud of how steady is looks considering how shaky I can get.
Finishing
For the final finishing step, I wanted to seal the paint as it could scratch very easily without an exterior coating. I had one option readily available in my closet which was an acrylic clear coating. It sealed the paint well, but the glass portions became a little cloudy instead of staying clear. It’s a very pretty effect but not what I was initially aiming for.

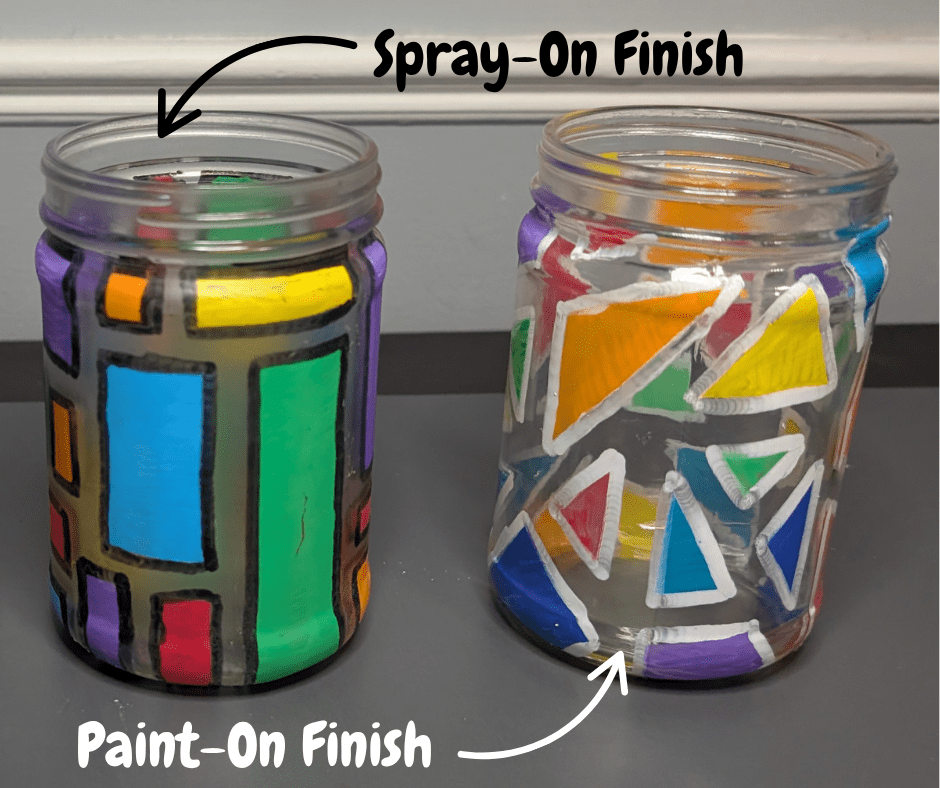
I decided to try a different product to see the difference, if any at all. This time I decided to use a paint on seal instead of a spray. I’m not actually sure if the application method or product brand is responsible for the effect. That is an interesting idea to explore.
Reflections
I really like the way this mosaic painted jar looks. I feel like they are super cute as home décor and easily customizable to fit any environment. All that is needed is an adjustment of color. What to do with these zhuzhed up jars was the next question. I love the idea of using them for tea-light, the paint does block some light but also bring an illuminating color to the ambience.
I feel like they are also great organizations jars but I think I will use anything as an organizer if allowed. I did spy some wax and essences in my crafting closet so I am curious if they will end up being a good container for a home-made candle.

Lessons
Persistence is Key
One thing about these jars that was difficult was applying the paint. The glass doesn’t really want to take the paint and so it will leave a lot of streaks or “messed up” areas. This isn’t really a problem, but it does mean that the areas will need multiple layers.
And each layer will need to be fully dried before the next is applied. If the paint is still wet when you go to add another layer, it will just smudge even more and not accept the new paint.
Another trick is to rough up the surface a bit to make it more amendable to take the paint. This can be done with fine grit sandpaper but must be done carefully and lightly to avoid major scratches or cracks.
Pattern
Mosaic Painted Jar
Ingredients
- 1 glass jar
- ¼ inch painter tape
- Paint pens any color and black
- Spray Paint black
- Acrylic sealing coating spray or paint on
Instructions
- Optional. Using black spray paint, paint the lid of the jar.
- Using the ¼ inch painters’ tape, create lines going around the jar. This should leave various shapes and patterns visible with tape outlines.
- With whatever desired color, paint the jar using a paint pen. Tip: for a more variated look, make sure no one color shares a border with a shape of the same color. Any type of acrylic paint would also be useful for this step; I just find pens easier to maneuver on the glass.
- Let dry and repeat above step until the paint is opaque and without streaks.
- Remove tape gently, scrape off any excess paint on the jar being careful not to scratch the desired paint.
- Using a black paint pen, create outlines around each shape.
- Cover the jar in the acrylic sealing coating, make sure to do this in a ventilated area. Let dry.


Leave a ReplyCancel reply