
This dreamcatcher keychain charm is a beautiful decoration and perfect for anyone who needs a good luck charm when traveling away from home.
Total Project Time: 1 hour
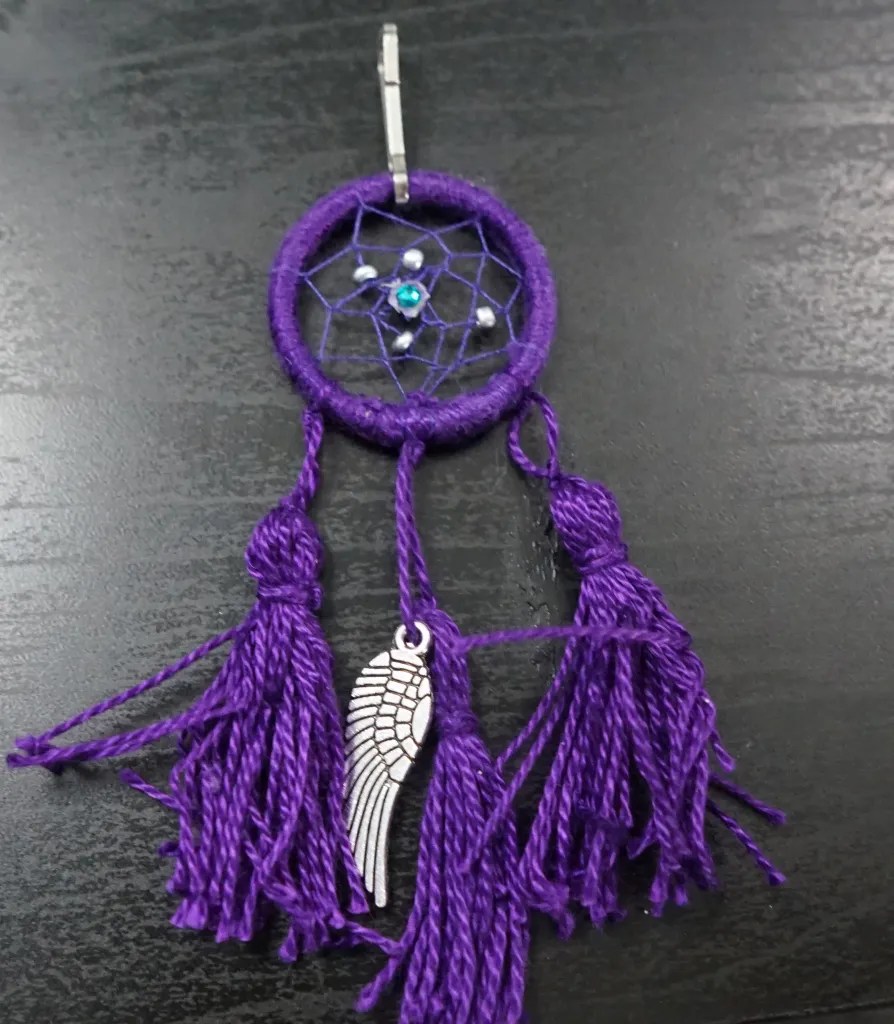
I have always been fascinated by dreamcatchers ever since I was a young girl. Their designs and the weaving of the threads made them look elegant and beautiful. While they didn’t always keep the nightmares away, I remember fully believing that superstition helped get rid of the bad dreams. And some did go away. So, the dreamcatcher brings good dreams!
Check out the Craft section of MCG for more fun patterns in strings and things or more unlimited ideas.
Supplies
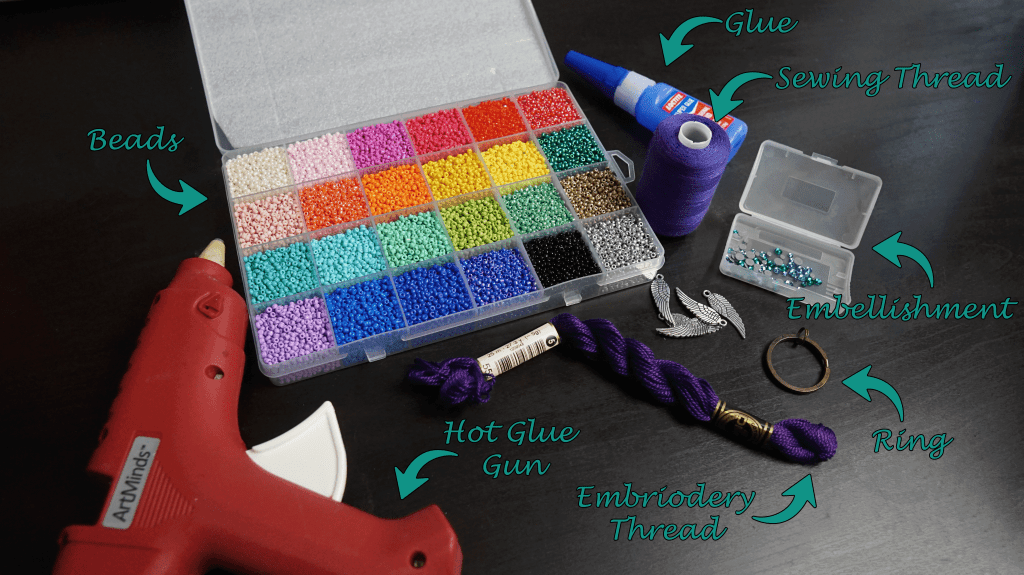
For this project, I used the following supplies:
- Large metal keyring
- Purple Embroidery Thread
- Purple Sewing Thread
- Super glue / Hot glue
- Silver beads
- Small Embellishment
This was a fairly simple project. The use of beads is optional, I just wanted to use the silver because I thought it made the project really pop. The color for the dreamcatcher is also completely up to you. I like to go with more cool colors because they remind me of the night sky. This leads me to more blues and purples.
Process
01
Wrapping the Ring
The first step in making the dreamcatcher keychain charm was wrapping the metal keyring. I did this bit directly to the keyring, but you can also use the keyring as a mold and wrap metal wire to make the core of the dreamcatcher.
I used a combination of slot in the metal and a dab of superglue to attach the thread to metal. And then it’s time to wrap! This process felt a little tedious but it’s better to overwrap because you don’t want any metal to show through once all is said and done.


02
Weaving the Center
The next step was the trickiest for me and that was weaving the center of the dreamcatcher. This took me several tries to produce the right method, but I finally landed on using a simple knotting method to complete the dream catcher. For this step, I used the sewing thread instead of the embroidery thread.
For this method, I ended up tying knots with the thread at various points around the ring. That gave me the first loop around the dreamcatcher. I would recommend putting at least seven knots’ sections in that original layer. Otherwise, it doesn’t look like that classic dreamcatcher style.
Then I weaved the thread around that first layer. For this, I tied knots on the center of each section from the first layer to give me a new set of sections for the second layer in.
I kept going round and round and distributed the beads that I had pre-threaded onto thread as I continued to work. The center proved to be a difficult challenge as I had to bring all the edges together. Mine ended up having a bit of a knot in the center but I decided to cover it up with a small embellishment. You can also use a bead.


03
Final Decorations
The last step to making this keychain is the decorations!! I like tassels but feel free to get creative, this is really an open playfield to make the charm be your very own! I like tassels since they’re easy to make and look pretty. I made mine out of embroidery thread.
I like making tassels by creating multiple loops. Then, on one end, I wrap another piece of thread and knot it around. This is the top of the tassel and the threads coming off it are what I used to attach it to my dream catcher.
After that, I used another piece of thread to create a “belt” a few steps down from the top. I like doing a tie, flip, tie method with two knots on each side. Then I used a needle to pull the thread through the center, so it hides amount the many strands.
Lastly, it’s time to give the tassel a haircut and cut the loops so they become more strands than having the loop end. I like to cut them more evenly which might not be the direct result from cutting all of the loops.


Reflections
This project was a lot fiddlier than I anticipated. That’s half because I didn’t really know what I was doing when I started and half because I decided to use a fairly small ring. I can see how making a dream catcher of normal size would be as difficult. That being said, I really like how it turned out and its pocket size allows for a lot of flexibility in its use.
Lessons
Working in Small Spaces
When working in tight spaces, sometimes my fingers get too big for the area that I’m working in. And that’s when I turn to using tools. With something like this, a needle is especially useful because it can help guide the thread into the proper locations. Finding tools to work in crafting situations is always the key to make crafting easier and fun!

Quick Recipe
Dreamcatcher Keychain
Materials
- 1 Large Metal Keyring
- Purple Embroidery Thread
- Purple Sewing Thread
- Super Glue or Hot Glue
- Silver Beads
- Small Embellishment
Instructions
For Dreamcatcher Keychain
- Attached thread to the ring core (metal keyring or wrapped metal wire) and wrap the thread around the metal core until it is no longer visible.
- Using the knotting method, attach the thread in seven to nine locations on the ring.
- Using the knotting method, attach the thread to the center of each line of thread in the previous row.
- Repeat step 3 until the threads reach the center. Knot to finish.
- Cover the center with a small embellishment or bead, use hot glue to super glue to attach.
- Decorate as desired!
For Tassels
- Wind the thread into multiple loops (the loops will be the size of the tassel).
- Using another piece of thread, thread the knot through the loops and then tie it together. This is the top of the tassel.
- Using another piece of thread, move a couple step from the top of the tassel. Tie a known around the whole bunch on loops. Flip the tassel over and tie another knot along the back of the loops using the same thread. Repeat twice and weave the loose ends of the thread into the tassel.
- On the bottom of the tassel, cut the loops is desired. Trim as needed.


Leave a Reply