
The Great British Bake Off is one of my favorite shows, inspiring new bakes, new flavors, and new techniques! Join me on my journey to bake through all the Season 8 Challenges.
Total Cooking Time: 1 hour and 30 minutes

The Great British Bake Off is a classic show for bakers and those looking for a friendly competition. All the bakes on the show look delicious and I often want to try baking them myself! I finally got off the couch and into the kitchen to recreate some of the recipes from Bake Off! I chose to start with season eight of Bake Off as it is my favorite season and the one with some of my favorite challenges!
The technical for week nine was a Les Miserable cake! Well, I guess they are more mini cakes since there are supposed to be nine of them. Now this cake almost stumped me because there is so little information on the internet about this recipe! I was expecting Prue to have offered up the recipe she uses but no! Maybe the recipe is a closely guarded secret or something.
I managed to find some semblance of guidance and came up with the recipe below! The process of making this was more fun than I expected although I can’t say I’m a big fan of the pistachio flavoring. This cake felt like a flavor bomb. There layers were filled with pistachio, lemon, and cherry. What could be better than that?
Check out the Season 8 Great British Bake Off Page to see other bakes from the series or the Make section for more recipes!
Ingredients

There were a lot more ingredients in this cake than I was expecting. Since there is no raising agent in the cake, the eggs become the raising agent. And the one I decided to use called for eleven eggs. Like what.
There are quite a few odd ingredients in this cake. Two that are easy to find but might not be in a staple in the kitchen, are almond flour and almond extract. I typically have almond flour in my pantry because I love making macarons!
The really unique ingredient for this recipe was pistachio paste. I could not find that in any of my local grocery stores, so I ended up going online to find what I was looking for. I wonder if this is typically not a common ingredient or if it’s just not common in the United States.
Process
01
Making the Jaconde Sponge
The first step in this process is making the jaconde sponges. There are two different flavors of jaconde sponges, but I started off by making a giant batched before separating the two different flavors.
The giant batch included multiple parts. First, I whisked together the almond flour, eggs, and sugar. The mix should be thick and ribbon like. I then put this to the side to create a quick merengue.
This step starts with only egg whites in my mixing bowl. I like getting my eggs a little frothy before adding in any sugar. I added in the sugar slowly and a little a time. Adding the sugar slowly helps it incorporate and break down into the egg’s whites. The merengue should create firm peaks when the whisk is removed.


Folding
Then, it’s time to start folding. So much folding. I folded the merengue into the almond/egg mixture first. The best method is folding some of the merengue at time. Like doing batches. I like doing this to really incorporate everything properly and it helps ease the merengue into the mix. It’s much easier on my arms if I do it in multiples steps.
But that’s not the end of the folding! Next is folding in the flour. And once the flour is folded in, then in the butter. And finally, I’m done folding. The batter should stiff be fluffy and no powders should be visible. I did my best to have the whole batter be one consistent color.
And the batch batter is finished! I divided the batter into two bowls for the two different flavorings. In one bowl, I added the pistachio paste, almond extract, and the green food coloring. I used a folding technique to make sure that the egg whites weren’t knocked out of the batter. In the other bowl, the lemon zest was added for flavor.
The batters were then put into their own separate sheet trays. I like using sheet trays as the baking tins when making cakes like this. I cooked the jaconde sponges for about ten minutes. They were firm but springy to the touch.
The cakes came out a little thinner than I had hoped for, but they still were fluffy and had a decent texture. I swear, I am terrible at baking jaconde sponges when they are supposed to be in thin layers.


02
Whisking up Some French Buttercream
Next, I wanted to make some French buttercream. I’m still not completely sure what the difference between the two are but I know this is the first time I’ve ever made a buttercream like this! The first step in making the buttercream was whisking up some egg yolks. I wanted them to be pale and creamy, so I beat them for a relatively long period of time.
Then I made a simple sugar syrup over the stove. I did this by dissolving the sugar in water over a low heat before bringing it up to temperature. The temperature I was aiming for was 240 degrees Fahrenheit which is right between the soft and the firm sugar stages.
Then it was time to mix the syrup into the eggs. I wanted to whisk continuously during this step because I did not want the eggs to cook. Well… I want them to cook a little bit but not a lot. Not like an egg on a stove. I used the stand mixer because that helps me greatly. If you don’t have a stand mixer, I believe this to be a two-person job with one person pouring and the other one mixing.
Once the mixture has come together and cooled down a bit, I added in the butter. I did this in chunks to give the butter a better chance of fully incorporating. And there we have our French Buttercream!
The buttercream also got split up into two difference flavors: vanilla and cherry. For the vanilla buttercream, I whisked in vanilla extract. I used fresh cherries for the cherry buttercream. A hint of cherry extract was also used to really get the flavor throughout the cream. I whisked in a handful of firm cherries. I wanted to get them consistently mixed without becoming mushy. Although it’s hard to make cherries mushy with just a bit of stirring.


03
Layering the Cake
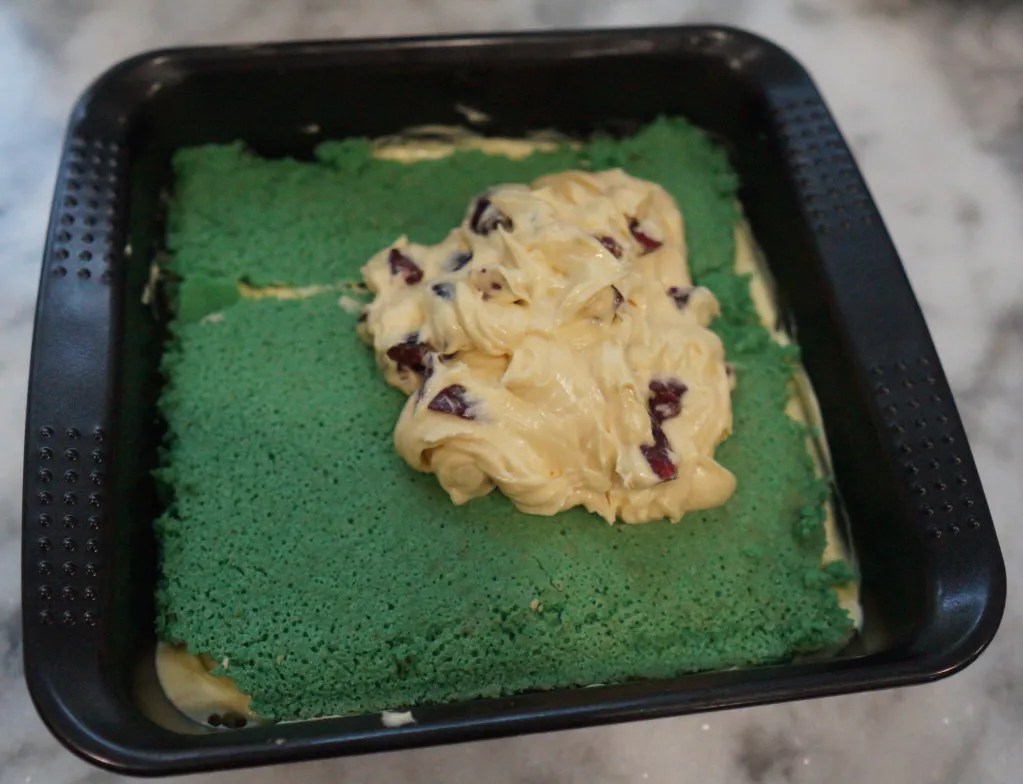
Layering the cake was the funniest and most challenging part of this whole recipe! I used a square cake tin because I felt it would be easier to create the cakes be making one large cake and cutting it than make several mini cakes.
I prepped the sponge by cutting out two sheets of each flavor in the size of the tin. Or at least I tried to. The sponges were not the happiest to stay together considering they were so thin. I decided to simply spread out the buttercream using a pallet knife.
I made my cake inverse of the result so the first layer (which is the top) is a lemon sponge layer. This was followed by a layer of vanilla buttercream. Then a layer of the pistachio sponge. The next layer, which ends up being the center, was a layer of cherry buttercream.
And now we’re working out way back out so a layer of pistachio sponge, a layer of vanilla buttercream, and a layer of lemon jaconde sponge. **Do not use all the buttercream! You want to save some for decorations. I definitely forgot to do this**
The final touch involves chocolate. I melted down some of my chocolate and created a thin layer of chocolate along the top of the sponge. This layer should cool down to room temperature before putting the entire tin to set in the fridge. I wanted the buttercream to be relatively firm.


04
Adding Decorations
While the cake was setting, I got to work making the decorations that would go on the top of each cake. For this, I’m using more chocolate. I melted down the chocolate again and this time spread it into a thin layer on acetate paper.
The chocolate should a little time to cool before scoring it so the shards would make 9 triangles. I waited too long at the chocolate set up on the acetate which wasn’t great. This is why I went for a plethora of chocolate shards as the decoration instead of a chocolate curl.
I took out the cake and inversed it, releasing it from the tin. I then carefully cut the cake into 9 pieces (a 3 by 3 grid). The originally plan for the top of each cake was a cherry, a chocolate curve, and line of buttercream. But instead, I used a grouping of chocolate shards. Still looks delicious!


Reflections
This cake gave me quite a lot of stress and a few moments of needing to lay down on the kitchen floor. This was quite the dessert, it was more than I bargained for, especially since it uses a jaconde type sponge (which I think it my biggest Achilles heel next to attention to detail)
Am I ready for bake-off? Why haven’t I been voted off the island yet? Oh right, I’m the only one on this island. Again, this is a technical that I wasn’t that excited to eat so I didn’t end up tasting it too much as time went on.
I really need to find a buttercream recipe that I like because so far, nothing has worked out for my taste.
Lessons
What does it mean to Temper Chocolate?
When you melt chocolate, you are melting the cocoa butter crystals (or the fat) inside of the chocolate. After allowing the chocolate to cool, the cocoa butter recrystallizing to have a firm and rigid structure.
If the melting process was uneven, then the cooling process (and crystallization process) will also be uneven. This unevenness is what causes chocolate to be dull and not have that shiny finish. Temperature is key!
- For semi-sweet chocolate, keep the temperature under 88 to 90 degrees Fahrenheit
- For milk chocolate, keep the temperature under 84 to 86 degrees Fahrenheit
- For white chocolate, keep the temperature under 82 to 84 degrees Fahrenheit.


recipe
Les Miserable
Ingredients
Jaconde (Sponge)
- 2 Cup Almond Flour
- 1 Cup Granulated Sugar divided ¾ cup and ¼ cup
- 5 Eggs
- 5 Egg Whites
- ¼ Cup All-Purpose Flour
- 2 ½ Tablespoon Unsalted Butter melted
- 2 Lemons finely zested
- 2 Tablespoon Pistachio Paste
- ½ Teaspoon Almond Extract
- Green Food Coloring
- ¼ Cup Dark Chocolate
French Buttercream
- 6 Egg Yolks
- 1 Cup Granulated sugar
- 1 ⅓ Cup Unsalted Butter
- 1 Teaspoon Vanilla Extract
- 10 Cherries
Decoration
- ¼ Cup Dark Chocolate
- 9 Cherries
Instructions
- Preheat the oven to 410 degrees Fahrenheit. Line two large baking tray with parchment paper and lightly grease.
The Jaconde (Sponge)
- Whisk together almond flour, eggs, and ¾ Cup sugar
- In a separate bowl, whisk the eggs whites until foamy. Slowly add in the remaining sugar (¼ Cup) until a stiff merengue is formed.
- Fold the meringue into the almond mixture over multiple batches. Add in the All-Purpose Flour and fold it in until everything is incorporated. Add in the melted butter and, again, gently fold.
- Divide the mixture into two bowls (for the two different flavors).
- In one bowl, add green food colors, pistachio paste, and almond extract.
- In the other bowl, add lemon zest.
- Pour each mixture into a prepared baking tray and level out.
- Bake the sponges for 9 to 11 minutes or until firm and springy to the touch.
French Buttercream
- Whisk the egg yolks until pales and fluffy.
- In a medium pan, combine sugar and ¼ Cup water. Heat on low until sugar is dissolved and then turn the heat up to medium until the mixture reaches 240 degrees Fahrenheit. Remove from heat and let cool until warm.
- While whisking constantly, slowly add the sugar mixture into the eggs. Whisk until the mixture is fully combined and cool.
- Add butter in chunks until the mixture becomes thick and creamy.
- Divide the Buttercream into two bowls with¾ in one bowl and ¼ in the other.
- In the bowl with ¾ Buttercream, add in vanilla extract.
- In the bowl with ¼ Buttercream, whisk in cherries until they are broken up but not mushy.
Layering
- Cut each cake into two squares, the size of the cake tin.
- For the layering, place a layer of lemon jaconde sponge, a layer of vanilla buttercream, a layer of pistachio jaconde sponge, a layer of cherry buttercream, a layer of pistachio jaconde sponge, a layer of vanilla buttercream, and a layer of lemon jaconde sponge.
- Melt ¼ cup chocolate and spread a thin layer of chocolate across the top of the lemon jaconde sponge. Allow to cool to room temperature and then place in the fridge to set.
Decorations
- Temper the remaining dark chocolate (see lessons for more details on tempering) and spread a thin layer across a sheet of acetate.
- Allow to cool slightly and score into triangles. Curl the acetate and place into a setting to keep the triangles in ac urled shape. Allow to cool completely at room temperature. (This can be done in the fridge if you are rushed for time).
- Demold cake from the tin and cut into 9 even, square mini cakes.
- Pipe a ribbon of buttercream across the top of each mini cake.
- Decorate each cake with one chocolate triangle, one cherry.
- Enjoy!!


Leave a Reply