
A Sewn Patchwork bookmark is an easy craft that can be used as a normal books mark or to bookmark two places!

I wanted to do a simple craft this week since I have some pretty large crafts looming in the background. I wanted to do something sewn and then I saw all of the scraps that I had in my pile of fabric.
Patchwork is a style that I love. Honestly, I wish I had more skills to pull off a complex and interesting patchwork style. But for now, I’ll just put pieces together and see how well that goes.
I decided to do a patchwork bookmark because I am always losing my place in my bullet journal. A patchwork bookmark felt like an easy project, but I did have some modifications to make it a little more different than an average bookmark. It just required some thread and grommets.
Check out the Craft section of MCG for more fun patterns in forever fabrics or more unlimited ideas. Leave a comment below and let me know what you think and how the pattern works for you!
Supplies

For this project, I gathered the following materials:
- Fabric, non-matching material
- 2 Grommets
- Embroidery Floss
Process
Sewing the Fabric Together
The first step of the project is sewing the scraps of fabric together. There wasn’t really a pattern or major method to this. My main goal was to make a square-ish shape that was approximately 3 inches but 19 inches with some working room around the edges.

I actually tried to find the weirdest shaped fabrics to work into the patchwork bookmark, but I only really had square and triangular pieces to work with. Either way, I enjoyed working with all those colors! Figuring out what fabric to put together was difficult. I didn’t want it to clash but I also kind of wanted it to clash a little bit.
I ended up having fabrics with blue being the core throughout all of the patchwork. I definitely have a preferred color. After getting my fabrics all together, I started sewing. Did I have a plan? Nope. I wish I could write something here about my master plan of making beautiful patchwork, but I just tried to find edges that fit each other and put everything together.


After creating the original “rectangle”, I folded the patchwork in half over the short edge to make the interior of the bookmark. It was approximately a little over one and a half inches wide. I then sewed both of the long edges to create a tube. Then it was onto some of the exterior details.
Adding the Tie
While I still had the patchwork bookmark inside out, I wanted to sew in the string I would use as a tie. I needed embroidery thread to do this. Green was my go to color because it was the easiest thing that I could find since I had left it out from a previous project.

I took six strands and made a long braid. This braid was too long. I don’t really know what I was thinking when I cut the embroidery thread, but I guess too much is better than too little? Still I made too too much.
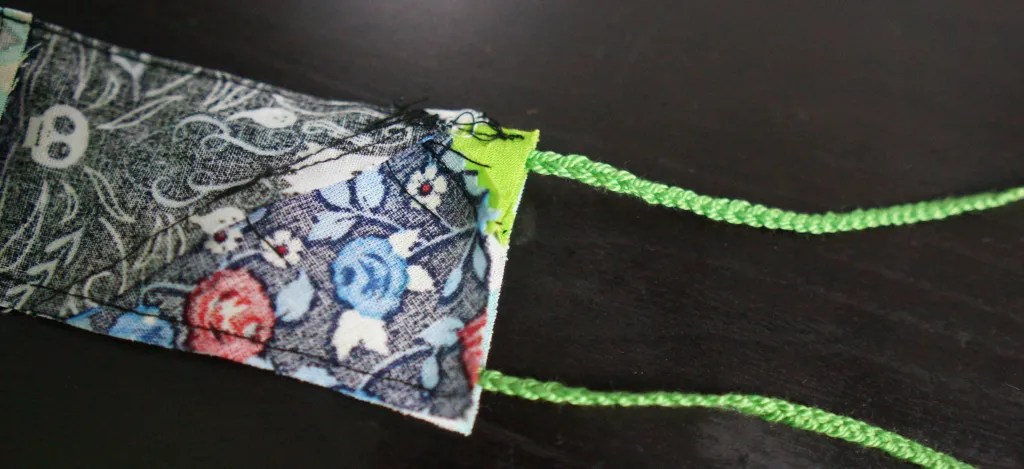

After I finished the braid, I placed it braid on one end of the tube with the ends sticking inside the tube. The ends will not be visible before the patchwork bookmark is sewn but will stick out once the project is turned right side out. I sewed this end shut and trimmed off the large excess amount of braid before turning the patchwork bookmark right side out.
Closing and Grommets
To close the patchwork bookmark, I used an invisible stitch to close the remaining open end. I did this stitch by hand since that’s the only way I know how to close a project (if you know of a good way to close sewn project, please let me know in the comments!)


Then it was time to add the final touch: the grommets. The grommets are so I can pull the strings through the bookmark and prevent the bookmark from slipping when in use. Grommets are fun to put in because it is a lot of hammering! I lined up the grommets where I wanted them and then hammered the caps into place.
Reflections
This felt like a fun, light project to do. It is something that has been on my mind for a while. Patchwork is so fun to do and making a patchwork bookmark seemed like the right go when I needed a bookmark to hold two different spots. An easy project that I would recommend if you are in need of a bookmark.
I also thought, after the fact, that I could have used Velcro as the material to stick the two ends together. While true, I kind of like the unique combination of the thread and grommets. But both are great options depending on what you have access to!


Lessons
Be Careful Hammering
It’s important to think about the surface underneath the hammer. Yes, there is fabric and grommets but what is under that? Is it something built to take pressure? What about wood? Or how about MDF (medium-density fiberboard).
Well, in my case, my table is made of MDF and the pressure of a hammer against the grommet will cause the table to crumble. It was not built to take that sort of consolidated pressure. I typically like to put a board down to work on that can absorb or spread the shock of the hammer. This helps to protect your furniture!
Quick Recipe
Patchwork Bookmark
Materials
- Fabric non-matching material
- 2 Grommets any color
- Embroidery Thread any color
Instructions
- Using scrap pieces of fabric, sewn each piece together into a square just over 3-inches by 19-inches. Patchwork is meant to show your style so have fun with it!
- Fold the patchwork piece, right side facing in, along the long edge to create a piece that is 1.5-inches by 19-inches. Sew both of the long sides.
- Using 6 embroidery threads, make an even braid. Place the tail end inside the tube (wrong side out still) and sew that end shut. Flip project right side out.
- Use a hidden stitch to close the open end of the bookmark. Attach grommets to this end spaced apart.


Leave a Reply